Laravel 5 image upload and Resize using image intervention
Designing websites and different forms in a websites often requires a image upload functionality. The requirement of image upload can be in various places like uploading a avatar for a user, adding image of a product or adding a post thumbnail. If you are developing your web app using Laravel 5, then uploading and maintaining images are not a tough task. In the tutorial Laravel 5 image upload and Resize, you will learn to upload an image for a particular product and displaying while needed.
HTTP Routing- Laravel Routing Tutorial
Laravel Views Tutorial- Creating a View
HTTP Controllers- Laravel Controllers Tutorial
Eloquent ORM - Laravel Models Tutorial
Now suppose you are creating a website, where you need to store the name, price, quantity and image of a product. So, first we can start creating a form for adding a product. Here, I'm using bootstrap for designing the front-end.
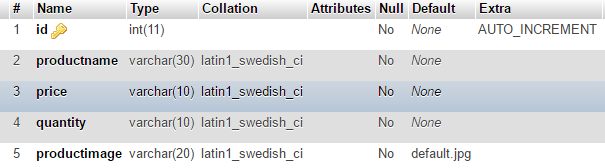
Here, name of the database table is products and the database structure is.

 Designing websites and different forms in a websites often requires a image upload functionality. The requirement of image upload can be in various places like uploading a avatar for a user, adding image of a product or adding a post thumbnail. If you are developing your web app using Laravel 5, then uploading and maintaining images are not a tough task. In the tutorial Laravel 5 image upload and Resize, you will learn to upload an image for a particular product and displaying while needed.
Laravel 5 image upload and Resize - Installing Image Intervention
Installing Image Intervention
We can install image intervention using composer. Run the following command to install the latest version of Image intervention-composer require intervention/image
Integrating with Laravel project
After successful installation, we need to integrate image intervention to our project.- Open file config/app.php
- In the providers array add the following line
Intervention\Image\ImageServiceProvider::class,
- In the aliases array add the following line
'Image' => Intervention\Image\Facades\Image::class,
Laravel 5 image upload and Resize - Creating a Form
I assume that you all know how to create routes, views, controllers and models. And also how to interact between them. If not, you can follow these tutorials first-HTTP Routing- Laravel Routing Tutorial
Laravel Views Tutorial- Creating a View
HTTP Controllers- Laravel Controllers Tutorial
Eloquent ORM - Laravel Models Tutorial
Now suppose you are creating a website, where you need to store the name, price, quantity and image of a product. So, first we can start creating a form for adding a product. Here, I'm using bootstrap for designing the front-end.
<form class="form-horizontal" enctype="multipart/form-data" role="form" method="POST" action="">
    <div class="form-group">
        <label for="productname" class="col-md-4">Product Name</label>
        <div class="col-md-4">
            <input type="text" name="productname" class="form-control">
        </div>
    </div>
    <div class="form-group">
        <label for="price" class="col-md-4">Price</label>
        <div class="col-md-4">
            <input type="text" name="price" class="form-control">
        </div>
    </div>
    <div class="form-group">
        <label for="quantity" class="col-md-4">Quantity</label>
        <div class="col-md-4">
            <input type="text" name="quantity" class="form-control">
        </div>
    </div>
    <div class="form-group">
        <label for="productimage" class="col-md-4">Add Image</label>
        <div class="col-md-4">
            <input type="file" name="productimage">
        </div>
    </div>
    <button type="submit" class="btn btn-success">Save Product</button>
</form>
Laravel 5 image upload and Resize - Resize image and save to storage
In your controller, write the following code to resize the image and finally save the image to the storage.Here, name of the database table is products and the database structure is.
$product = new \App\Product;
$product->productname = $request->productname;
$product->price = $request->price;
$product->quantity = $request->quantity;
//check if user has choosen a image
if($request->hasFile('productimage')){
 $productimage = $request->file('productimage');
        //Give a unique and random file name of the image
 $filename = time() . '.' . $productimage->getClientOriginalExtension();
        //Resize the image and save to the folder images/uploads/products
 Image::make($productimage)->resize(300, 300)->save(public_path('/images/uploads/products/'. $filename));
        //Store the file name of the image to database
 $product->productimage = $filename;
}
$product->save();
Here, you can notice I'm only storing the file name of the image to the database. So, whenever you need to access the file, you can use-
<img src="{{asset('/images/uploads/products/'.$product->producimage)}}" />


0 comments:
Post a Comment