Laravel Blade Template Tutorial- Defining Master Layout
In the last tutorial we learned to create a view. While creating a view we were using the plain php codes to run php scripts. Using plain php code is not a bad idea, but we can write more readable and easy php codes using Blade Template provided by laravel. The Laravel Blade Template provides an easy and more readable way of writing php codes. Before going through this tutorial, I strongly recommend you to learn about Laravel Views, the previous tutorial of this website.
Laravel Views Tutorial- Creating a View
The Blade template provides an easy and more readable way of writing syntax. The extension of blade view file is .blade.php, so before applying the blade syntax, we need to rename our old view files from filename.php to filename.blade.php. And keep it in mind that we can also use plain php codes inside the blade views.
Let's have a look on how we displayed data on a view in the previous tutorial.
The syntax was something like this-
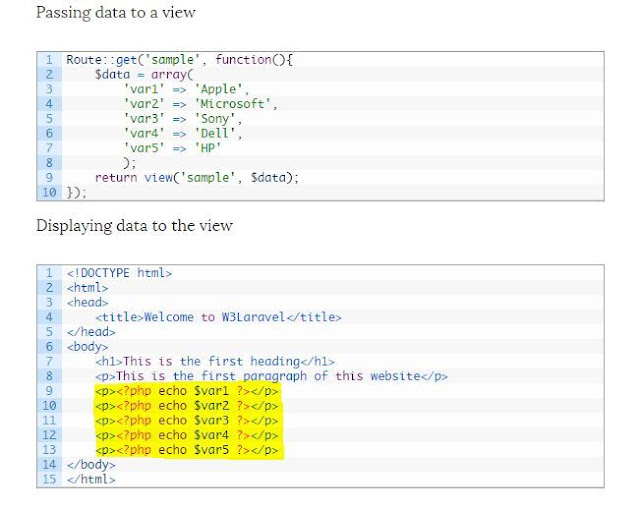
So, how we can write more readable and easy php code for echoing data to a view?
We can do that by simply replacing <p><?php echo $var1 ?></p> with {{ $var1 }}. We don't need to start and end php every time using <?php and ?>
Similarly,
<p><?php echo $var2 ?></p> with {{ $var2 }}
<p><?php echo $var3 ?></p> with {{ $var3 }}
<p><?php echo $var4 ?></p> with {{ $var4 }}
<p><?php echo $var5 ?></p> with {{ $var5 }}
So, what exactly need to do or change from the previous tutorial?
You need to
You are done. See the output of this view, It will be exactly same as the previous one.
The syntax for ternary operator is pretty much simple in blade template as compared to php plain code.
Let's have an example- Suppose you want to print the name of the city, If the name of the city is set by the user otherwise a message to do that.
You don't need to write a long php code, just put
and you are done.
The Laravel Blade Template also provides a convenient short-cuts for using php control statements. Below is the description of how we can use php control statements without writing plain php codes.
You already know how to use if statement using plain php codes. But the blade template uses a very simple and more readable for using If statements. The @if, @elseif, @else and @endif directives are used to construct a if statement. Let's have an very simple example-
This example shows, if the age of a person is less than or equal to 19, it will print Teenager, for the person of age between 19 to 40 Young Man, otherwise Old man. This is a very simple example of if statement. You can do much more with laravel blade template engine.
The Laravel Blade also provides @unless and @hasSection directives which are quite useful.
@unless directive
@hasSection directive
The blade template provides an easy directives for using php's loop statements like @for, @endfor, @foreach, @endforeach, @while and @endwhile.
Example of for loop-
Example of foreach loop-
Example of while loop-
The @include('viewname') directive is used for including a view inside another view. The child view will have all the variables that are available to parent view.
As we all see most of the web applications uses the same layout for all the pages. In laravel blade template engine we can easily define a master layout and then can extend it across all the pages.
The @section and @yield directives are used for defining a master layout.
Create a new file called master.blade.php inside resources -> views -> layouts folder and write the following code-
The pages which extends the master layout will have the same layout as defined in the master layout. The @extends directive is used for extending the layout. The @section directive is used for injecting data to the master layout, which are being displayed using @yield directive into the master layout.
This is how to create a master layout in Laravel Blade template engine. Create more pages with master layout, design your master layout using style sheets etc. These will help you to have a clear concept of laravel Blade templates.
Today we learned to create a master layout for all the pages. If you are having any query regarding this tutorial, i will love help you. Just leave a comment below and I'll take care of all.
 In the last tutorial we learned to create a view. While creating a view we were using the plain php codes to run php scripts. Using plain php code is not a bad idea, but we can write more readable and easy php codes using Blade Template provided by laravel. The Laravel Blade Template provides an easy and more readable way of writing php codes. Before going through this tutorial, I strongly recommend you to learn about Laravel Views, the previous tutorial of this website.
Laravel Views Tutorial- Creating a View
Blade Template: Basics
Introduction
The Blade template provides an easy and more readable way of writing syntax. The extension of blade view file is .blade.php, so before applying the blade syntax, we need to rename our old view files from filename.php to filename.blade.php. And keep it in mind that we can also use plain php codes inside the blade views.
Echoing data
Let's have a look on how we displayed data on a view in the previous tutorial.
The syntax was something like this-

So, how we can write more readable and easy php code for echoing data to a view?
We can do that by simply replacing <p><?php echo $var1 ?></p> with {{ $var1 }}. We don't need to start and end php every time using <?php and ?>
Similarly,
<p><?php echo $var2 ?></p> with {{ $var2 }}
<p><?php echo $var3 ?></p> with {{ $var3 }}
<p><?php echo $var4 ?></p> with {{ $var4 }}
<p><?php echo $var5 ?></p> with {{ $var5 }}
So, what exactly need to do or change from the previous tutorial?
You need to
- Rename sample.php to sample.blade.php.
- Edit the renamed file like this
<!DOCTYPE html>
<html>
<head>
 <title>Welcome to W3Laravel</title>
</head>
<body>
 <h1>This is the first heading</h1>
 <p>This is the first paragraph of this website</p>
 {{ $var1 }}<br />
 {{ $var2 }}<br />
 {{ $var3 }}<br />
 {{ $var4 }}<br />
 {{ $var5 }}<br />
</body>
</html>
You are done. See the output of this view, It will be exactly same as the previous one.
Ternary Operator
The syntax for ternary operator is pretty much simple in blade template as compared to php plain code.
Let's have an example- Suppose you want to print the name of the city, If the name of the city is set by the user otherwise a message to do that.
You don't need to write a long php code, just put
{{ $city or 'Set prefferd city' }}
and you are done.
Blade Template: Control Statements
The Laravel Blade Template also provides a convenient short-cuts for using php control statements. Below is the description of how we can use php control statements without writing plain php codes.
If Statement
You already know how to use if statement using plain php codes. But the blade template uses a very simple and more readable for using If statements. The @if, @elseif, @else and @endif directives are used to construct a if statement. Let's have an very simple example-
@if ($age <= 19)
     Teenager
@elseif ( $age > 19 and $age <=40 )
 Young Man
@else
    Old man
@endif
This example shows, if the age of a person is less than or equal to 19, it will print Teenager, for the person of age between 19 to 40 Young Man, otherwise Old man. This is a very simple example of if statement. You can do much more with laravel blade template engine.
The Laravel Blade also provides @unless and @hasSection directives which are quite useful.
@unless directive
@unless (Auth::check())
    Please sign in.
@endunless
@hasSection directive
<title>
    @hasSection ('title')
        @yield('title') - Web App Name
    @else
        Web App Name
    @endif
</title>
Loops
The blade template provides an easy directives for using php's loop statements like @for, @endfor, @foreach, @endforeach, @while and @endwhile.
Example of for loop-
<p>Table of 4</p><br />

@for($i = 1; $i <= 10; $i++)
 {{$i * 4}}<br />
@endfor
Example of foreach loop-
@foreach ($employees as $employee)
    <p> Name of Employee - {{ $employee->name }}</p>
@endforeach
Example of while loop-
<p>Table of 4</p><br />

<?php $i = 1; ?>
@while( $i <= 10 )
 <p>{{ $i * 4 }}</p>
 <?php $i++; ?>
@endwhile
Notice at the example of while loop. Here we have used plain php code for initializing and incrementing the variable, because the blade template does not have any special syntax for this.
Including other views
The @include('viewname') directive is used for including a view inside another view. The child view will have all the variables that are available to parent view.
@include('sample')
Blade Template: Defining a Master Layout
As we all see most of the web applications uses the same layout for all the pages. In laravel blade template engine we can easily define a master layout and then can extend it across all the pages.
Defining a Master layout
The @section and @yield directives are used for defining a master layout.
Create a new file called master.blade.php inside resources -> views -> layouts folder and write the following code-
<!DOCTYPE html>
<html>
<head>
    <title>@yield('title') - My App</title>
</head>
<body>

    @section('sidebar')
        Master Sidebar
    @show

    <div class="container">
        @yield('content')
    </div>

</body>
</html>
- @yield('title') - Displays the title of the page given in the child page.
- @section('sidebar') - Defines a section named sidebar.
- @show - Displays the contents of the section sidebar.
- @yield('content') - Displays the contents of the content section defined into the child page.
Extending Master Layout
The pages which extends the master layout will have the same layout as defined in the master layout. The @extends directive is used for extending the layout. The @section directive is used for injecting data to the master layout, which are being displayed using @yield directive into the master layout.
- Create a new file called page.php (Any name you like).
- Write the code
@extends('layouts.master') @section('title', 'Page Title') @section('sidebar') @parent <p>It will be displayed into the master sidbar.</p> @endsection @section('content') <p>This is the first page which is using a master layout.</p> @endsection- @extends('layouts.master')- Extending the layout master stored in layouts folder.
- @section('title', 'Page Title')- Define a section title with value Page Title.
- @section('sidebar')- Defines a section sidebar.
- @parent - Displays the contents of the section sidebar defined into the master layout.
- @section('content')- Defines a section content.
- @endsection- Ends a section.
- Create a route for this page.
Route::get('page', function(){ return view('page'); }); - Open this page into your web browser.
This is how to create a master layout in Laravel Blade template engine. Create more pages with master layout, design your master layout using style sheets etc. These will help you to have a clear concept of laravel Blade templates.
Conclusion
Today we learned to create a master layout for all the pages. If you are having any query regarding this tutorial, i will love help you. Just leave a comment below and I'll take care of all.


casecade dropdown using laravel and filter from database table using laravel
ReplyDeleteHello!
ReplyDeleteRead about Laravel Framework & got to know that Blade Templating Engine is one of the main features of Laravel Development Framework. I am learning & trying to implement all that I come across. This is quite helpful. Thanks for sharing.