The complete Lavarel framework development tutorial

Powered by Blogger.

Wednesday 24 May 2017

Laravel 5.4- User Roles and Permissions using Middleware


Hello Guyz, In this tutorial we will learn setting different permission to users based on their roles. We often need to allow different tasks for different users. For example- if you are having a blog and you want to add an user that can only write and read articles, he can't change themes or any other things that an admin can do. So if you are developing your website using Laravel framework then setting user roles and permissions is quite easy. You just need to set up a middleware, and protect the corresponding route using that middleware. That's it. So let's start.

User Roles and Permissions: An Example

Let's take an example of website where there is three user roles. First is admin, another is staff and the last is subscriber. Admin can access each and every page, but there are some limitations for staff and the subscriber is only allowed to access home page. Here we will learn how we can create middlewares and protect our routes from unauthorized access by setting user roles and permissions.

User Roles and Permissions: Database Modification

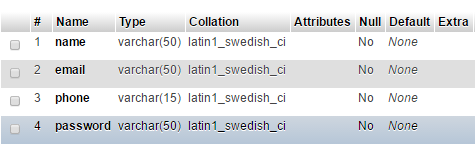
The all we need to do is add a column to users table. We need to add a role column to users table, so that we can find whether the logged in user is a admin, staff or a subscriber. We can further create a web page for changing user roles and permissions. But that is not our topic. Here we will learn how we can limit unauthorized users from accessing our routes.

User Roles and Permissions: Creating Middleware

We can use artisan for creating a middleware. Here I'm gonna create only two middlewares- AdminMiddleware and StaffMiddleware
php artisan make:middleware AdminMiddleware
php artisan make:middleware StaffMiddleware
Two new classes will be created in app/Http/Middleware folder after executing these commands. Now we need to write some logic to these classes.

User Roles and Permissions: Writing Logic

Let's have a look to our requirements again. The staff have some limitations, but admin can access all routes. Open the AdminMiddleware class. There will a function already defined named handle. In that function write this-
if(Auth::user()->role == 'admin') // is an admin
{
    return $next($request); // pass the admin
}

return redirect('/'); // not admin. redirect where ever you like
Here I'm checking to the role column of users table. If it is equal to admin then we are giving them permission to access that route, otherwise redirecting them to some other route or you can also redirect them to an dedicated unauthorized page.

Now open StaffMiddleware class and in the handle function write this-
if(Auth::user()->role == 'admin' or Auth::user()->role == 'staff') // is an admin
{
    return $next($request); // pass the admin
}

return redirect('/');
Here again I'm doing the same thing, checking the roles column. But here the admin and the staff both can access that route. This is because an admin can access each and every route.

User Roles and Permissions: Protecting routes

Registering Middleware

Before protecting our routes, we need to register that middleware in a key. Simply open the file app/Http/kernal.php and add two more entries to the $routeMiddleware array.  You can use admin key for AdminMiddleware and staff key for the StaffMiddleware.
'admin' => \App\Http\Middleware\AdminMiddleware::class,
'staff' => \App\Http\Middleware\StaffMiddleware::class,

Routes which can be accessed by Subscribers, staffs and admins

The pages which you want should be accessible by subscribers, protect them using auth middleware. In this way all the users (admins, staffs and subscribers) can access that route.
Route::get('subscrbers-route', 'SomeController@someFunction')->middleware('auth');

Routes which can be accessed by Staffs and admins

These routes should be protected by staff middleware. Remember in the StaffMiddleware we are giving access to both the admin and the staff. So the routes which are being protected by staff middleware can be accessed by admin and staff, but can not be accessed by subscriber.
Route::get('subscrbers-route', 'SomeController@someFunction')->middleware('staff');

Routes which can be accessed by only admins

These routes should be protected by admin middleware. In this way any user having role admin can only access this route. Others will be redirected to the page what ever you have defined to class.
Route::get('subscrbers-route', 'SomeController@someFunction')->middleware('admin');

Conclusion

This is how we can assign different roles to different users. In addition you should create a page for admin to change the roles of users. In this way an admin can anytime set user roles and permissions.

If you found this tutorial, kindly share to your friends and help others too.

Tuesday 7 March 2017

Laravel 5- Insert data into MySQL database


The database is the backbone of any web development. We often need to store the user data into our database and further retrieve the data and display in the web pages. In this tutorial you will learn how you can insert data into MySQL database using Laravel 5. MySQL is the most popular database management system used with PHP and PHP frameworks.

Laravel 5- Insert data into MySQL database- Database and Model

The very first thing we have to do is creating a database for our web application. There are a number of ways you can create a database. Some of them can be-
  • Laravel Migration- It helps creating database using php. Learn more- https://laravel.com/docs/5.4/migrations
  • phpmyadmin (recommended)- It is a tool to manage MySQL databases using a web browser. It makes managing database very easy. Learn more about phpmyadmin- https://www.phpmyadmin.net/
  • SQL- You can run sql queries using terminal
Create a database using any of the above method named blog (You can give it any name). Add a table named posts and then add five columns- id, title, body, created_at and updated_at.
The next thing you have to do is create a model for corresponding database.
php artisan make:model Post
To learn more about Laravel Model, read this-

Eloquent ORM - Laravel Models Tutorial

Laravel 5- Insert data into MySQL database- Configuration

To insert data into MySQL database you need to configure your database with your web app. Open .env file from the root directory and update these fields.
DB_CONNECTION=mysql
DB_HOST=127.0.0.1
DB_PORT=3306
DB_DATABASE=blog  // your database name
DB_USERNAME=root  // your database username
DB_PASSWORD=      // your database password

Laravel 5- Insert data into MySQL database- Routes and Controllers

For a very basic example, we just need to add two routes. This is enough for now to learn how can you insert data into MySQL database.
url Request Type Points to Use
posts/create GET PostController@create Display a form for writing post data
posts POST PostController@store Store data into database
Create a controller named PostController.
php artisan make:controller PostController
In the PostController define two functions.

create

public function create()
{
    return view('posts.create');
}
This will display a view named create inside resources/views/posts directory.

store

public function store(Request $request)
{
    $post = new Post;
    $post->title = $request->title;
    $post->body = $request->body;

    $post->save();
}
This will create a instance of Post model, set all the attributes and finally will save data into database. We don't need to set attribute for columns created_at and updated_at. These are managed by laravel.

Laravel 5- Insert data into MySQL database- View

Above, we have define a route and a function to display a form so that we can enter data and click the save button to save data into database. We are going to create that form. Create a new file called create.blade.php inside resources/views/posts directory (You need to create posts directory by yourself).
<!DOCTYPE html>
<html>
<head>
 <title>Add new Post</title>
 <link rel="stylesheet" href="https://maxcdn.bootstrapcdn.com/bootstrap/3.3.7/css/bootstrap.min.css" integrity="sha384-BVYiiSIFeK1dGmJRAkycuHAHRg32OmUcww7on3RYdg4Va+PmSTsz/K68vbdEjh4u" crossorigin="anonymous">
</head>
<body>
<form class="form-horizontal" method="POST" action="{{url('posts')}}">
<fieldset>

<!-- Text input-->
<div class="form-group">
  <label class="col-md-4 control-label" for="title">Title</label>  
  <div class="col-md-4">
  <input id="title" name="title" type="text" placeholder="" class="form-control input-md">
    
  </div>
</div>

<!-- Textarea -->
<div class="form-group">
  <label class="col-md-4 control-label" for="body">Body</label>
  <div class="col-md-4">                     
    <textarea class="form-control" id="body" name="body"></textarea>
  </div>
</div>

<!-- Button -->
<div class="form-group">
  <label class="col-md-4 control-label" for=""></label>
  <div class="col-md-4">
    <button id="" name="" class="btn btn-success">Save</button>
  </div>
</div>

{{csrf_field()}}
</fieldset>
</form>

</body>
</html>
In the form, I have added a helper {{csrf_field()}}. The CSRF (cross-site request forgery) helps our site from malicious exploit, where unauthorized command are being performed on behalf of an authenticated user. Whenever you are performing a POST, PUT or DELETE request from your HTML form, you need to add this helper within your form.
Finally test your code. To insert data into MySQl database visit http://your-site-url/posts/create, enter title and body and click on the save button.

Conclusion

Here, you learned how you can insert data into MySQL database in Laravel 5. Laravel makes web development very easy. We don't need to make connections with the database, neither writing sql queries.

Follow us to learn more about Laravel.

Sunday 5 March 2017

Laravel Form Validation- Server Side form validation


Whenever a user submits a form, the input must be validated to ensure that our app is working on clean and useful data. Validating form data prevents user from entering invalid data. For example- if a user is asked to enter their Email address and if the user enters it in wrong format, then we can prevent them and can ask to re-enter the Email id in correct format. Similarly, we can validate form data for required fields, numeric data, max characters etc using laravel validation.

Laravel provides a powerful validation features that enable us to easily validate our form data. If the data is not valid it automatically redirects to the previous location with errors. Let's see how laravel validation works.

Laravel Form Validation- A Quick Example


Let's have a very simple example of how laravel validation works.

Here, I am going to create a sign-up form to create a new user account.

Defining Routes


Route::get('register', function(){
    return view('register');
});
Route::post('register', 'UserController@register');

Creating Registration Form


For this, first we need to create a view that contains the register form. Here, I've created a view named register and created a form inside this. I am using bootstrap for designing the form.

You can learn about Laravel Views here.

<!DOCTYPE html>
<html>
<head>
<title>Take Appointment Online</title>
<link rel="stylesheet" href="https://maxcdn.bootstrapcdn.com/bootstrap/3.3.7/css/bootstrap.min.css" integrity="sha384-BVYiiSIFeK1dGmJRAkycuHAHRg32OmUcww7on3RYdg4Va+PmSTsz/K68vbdEjh4u" crossorigin="anonymous">
</head>
<body>
<form class="form-horizontal">
<fieldset>

<!-- Form Name -->
<legend>Fill the form to Register</legend>

<!-- Text input-->
<div class="form-group">
<label class="col-md-4 control-label" for="name">Name</label>  
<div class="col-md-4">
<input id="name" name="name" type="text" placeholder="Your Full Name" class="form-control input-md">

</div>
</div>

<!-- Text input-->
<div class="form-group">
<label class="col-md-4 control-label" for="email">Email</label>  
<div class="col-md-4">
<input id="email" name="email" type="text" placeholder="someone@example.com" class="form-control input-md">

</div>
</div>

<!-- Text input-->
<div class="form-group">
<label class="col-md-4 control-label" for="mobile">Mobile</label>  
<div class="col-md-4">
<input id="mobile" name="mobile" type="text" placeholder="+91" class="form-control input-md">

</div>
</div>

<!-- Multiple Radios (inline) -->
<div class="form-group">
<label class="col-md-4 control-label" for="gender">Gender</label>
<div class="col-md-4"> 
<label class="radio-inline" for="gender-0">
<input type="radio" name="gender" id="gender-0" value="Male">
Male
</label> 
<label class="radio-inline" for="gender-1">
<input type="radio" name="gender" id="gender-1" value="Female">
Female
</label>
</div>
</div>

<!-- Password input-->
<div class="form-group">
<label class="col-md-4 control-label" for="password">Password</label>
<div class="col-md-4">
<input id="password" name="password" type="password" placeholder="Password" class="form-control input-md">

</div>
</div>

<!-- Password input-->
<div class="form-group">
<label class="col-md-4 control-label" for="corfirm">Confirm Password</label>
<div class="col-md-4">
<input id="corfirm" name="corfirm" type="password" placeholder="Confirm Password" class="form-control input-md">

</div>
</div>

<!-- Button -->
<div class="form-group">
<label class="col-md-4 control-label" for=""></label>
<div class="col-md-4">
<input type="submit" class="btn btn-success" value="Register">
</div>
</div>

</fieldset>
</form>

</body>
</html>

Creating the Controller


You all know how to create controller, if not you can prefer reading HTTP Controllers- Laravel Controllers Tutorial.

Here, we need to create a controller to store the form data into our database.
<?php

namespace App\Http\Controllers;

use Illuminate\Http\Request;

use App\Http\Requests;

class UserController extends Controller
{
//
 public function register(Request $req){
  $user = new \App\User;
  $user->name = $req->name;
  $user->email= $req->email;
  $user->mobile = $req->mobile;
  $user->gender = $req->gender;
  $user->password = $req->password;

  $user->save();

  echo "User Created Successfully";

 }
}


When you execute this project the data entered into the form will be saved to corresponding model. However the data may contain something that is not useful for our app.

Writing Validation Logic


For validating the form data validate method is used. The validate method accepts the incoming HTTP request and a set of validation rules. If there is no error into our input data the following code will execute normally, however in case of any error a redirect response will be generated and will be automatically sent back to the user.

Here we can apply different validation logic for different form elements. So, our updated controller class will be like this.

<?php

namespace App\Http\Controllers;

use Illuminate\Http\Request;

use App\Http\Requests;

class UserController extends Controller
{
//
 public function register(Request $req){

  $this->validate($req, [
   'name' => 'required',
   'email' => 'required|email',
   'mobile' => 'required|max:10|min:10',
   'gender' => 'required',
   'password' => 'required|confirmed',
   'password_confirmation' => 'required',
  ]);
  $user = new \App\User;
  $user->name = $req->name;
  $user->email= $req->email;
  $user->mobile = $req->mobile;
  $user->gender = $req->gender;
  $user->password = $req->password;

  $user->save();

  echo "User Created Successfully";

 }
}

Here, I've used the following validation logics
  • required- Field under this validation must be present and should not be empty. A field is said to be empty, if it contains null, empty string, empty array or uploaded file having no path.
  • email- Checks for an valid email address having correct format of an email address.
  • max- The number of characters in the field should be less than or equal to the given value.
  • min- The number of characters in the field should be greater than or equal to the given value.
  • confirmed- It matches the value of two inputs. This field should have a matching confirmation field for matching. For example for a password validator field, there should be a password_confirmation field.

Displaying the Errors


As we already have discussed that laravel automatically redirects the user to the previous location in case of validation fails. Here we even don't need to explicitly bind the errors to our get route. All the validation errors will be flashed to the session while redirecting to the previous location. We can check for available errors and then can print all the errors. The error are stored in $errors variable.

@if (count($errors) > 0)
 <div class="alert alert-danger">
 <ul>
  @foreach ($errors->all() as $error)
   <li>{{ $error }}</li>
  @endforeach
 </ul>
 </div>
@endif

Laravel Form Validation- AJAX Request and Validation Example


Nowadays most of web applications uses ajax request. In case of ajax request, Laravel does not redirects to the previous location, but generates a json response that we can print to our view using js.

We can make an ajax call and can print all errors (in case of validation error) like this.

$("#form-id").submit(function(e){
 e.preventDefault();
 $.ajax({
  url: "url",
  type: "POST",
  data: new FormData(this),
  contentType: false,
  cache: false,
  processData:false,
  success: function(data){
   //do something on success                       
  },
  error: function(data){
   var errors = data.responseJSON;
   for(i in errors){
    $("#div-id").append('<p>'+errors[i]+'</p>');
   }
  }           
 });
});

There are a number of validation rules are available for Laravel form Validation.
Click to see all validation rules

Conclusion

By using Laravel Server side form validation we can prevent user by entering wrong data. It helps in collecting clean data from the users. It can helps to store data in right format. You can also use js to validate forms but that is not secure. Use Laravel form validation for a secure validation on HTML forms.

Laravel CRUD operations using Resource Controller


Laravel resource controllers are helpful in case you want to handle all the HTTP request for a resource. For example if you are creating a blog then you must want to perform each and every request to a post. The resource controllers are like simple controllers, but also provides all the methods predefined for performing each and every request. In this tutorial we will learn how we can perform all the CRUD operations using resource controller.

Laravel CRUD operations using Resource Controller: Database and Model

The database design may vary depending upon requirements. In this tutorial, I am taking an example of posts table having 3 columns id, title and body.

This is enough for learning purpose. So create the database and do create the corresponding model too.

If you are not familiar with model, visit the below link to learn about models.

http://www.w3laravel.com/2016/08/eloquent-orm-laravel-models-tutorial.html

Laravel CRUD operations using Resource Controller: Creating Resource Controller and Routes

The resource controller is same as other controllers but it has predefined methods for all of the HTTP requests on a resource. For example you can have a controller that manages blog posts like creating a post, indexing all the blog post, editing, updating etc.

The make:controller is used to make a controller. We can add --resource prefix to make a resource controller.

php artisan make:controller PostController --resource
We even don't need to add individual route for each Http reuests. We can define a single resource route that will take care of all.

Route::resource('posts', 'PostController');
The following actions can be performed on a Resource Controller

Request Type URL Points to method Purpose
GET /posts index Index all the posts
GET /posts/create create Display form for creating a new Post
POST /posts store To store the post into database
GET /posts/{id} show Display a single post
GET /posts/{id}/edit edit Display a form to edit the post
PUT/PATCH /posts/{id} update Update some or all field of the post
DELETE /posts/{id} destroy Deletes a post

Laravel CRUD operations using Resource Controller: Writing Logics

Great, you have the basic idea resource controllers. Now you can learn to write logics to perform actions that is How to perform CRUD operations using resource controller.

index

You can index all the posts of a Post model using all() method.
$posts = Post::all();
And then you can return a view with all posts or simply can return json format for api calls.

create

You can simply return a view that contains a form for adding a new blog post.
return view('your-view-name');

store

To store a post data to database you have to create a new instance of Post model and then you can use save() method.
public function store(Request $request)
{
    $post = new Post;
    $post->title = $request->title;
    $post->body = $request->body;

    $post->save();
}

show

To show a particular blog post you can use the find() method with the id of the post as an argument.
$post = Post::find($id);

edit

Same as create. Display a view that contains a form to edit a post.

update

The save() method can also be used to update any model that already exists in our database. First you need to retrieve the post using find() method and then set the attributes that you want to update. And finally call the save method to update the post.
$post = Post::find($id);

$post->title = 'New Title';

$post->save();
Remember, HTML forms can only make GET and POST request. To make a PUT request from HTML form you can use method_field helper
{{ method_field('PUT') }}

destroy

Here again you need to use find() method to retrieve the post that you want to delete and finally call the delete() method to delete the post.
$post = Post::find($id);
$post->delete();
Again, you can make a delete request using method_field helper.
{{ method_field('DELETE') }}

Conclusion

These actions can also be performed without using the resource controller and resource route, but the laravel resource controller makes the task easy. You don't need to define functions, you don't have to create different routes for each request, really easy.

So, finally we can easily perform CRUD operations using resource controller on a laravel web app.

Follow us to get more and also share to help others.

Friday 3 March 2017

Laravel- QR code generator example using Simple QrCode Package


QR codes are designed to carry a bunch of data. It has greater storage capacity and fast readability as compared to barcodes. QR codes are consists of black squares horizontally and vertically on a white background. This can be read by imaging devices like cameras. The QR codes can be used in applications where you need to track any product, to identify any item or for time tracking etc. There are a number of libraries you can use to generate your own custom QR code. Here I'm going to explain in brief how you embed a QR code generator in your laravel web application.

Laravel- QR code generator example- Configuration

We need a little configuration, to embed a QR code generator in our laravel web application. Follow the following steps-
  • Open composer.json file from your root directory and add the Simple QR package package in the require array.
    "require": {
        "simplesoftwareio/simple-qrcode": "~1"
    }

  • Run the command.
    composer update

  • Open app/config/app.php file and add the following class to the providers array.
    SimpleSoftwareIO\QrCode\QrCodeServiceProvider::class

  • Within the same file add the following line to aliases array.
    'QrCode' => SimpleSoftwareIO\QrCode\Facades\QrCode::class

Congrats, you have embedded a QR code generator to your laravel web application. Now we need to know about how we can generate custom QR codes using this QR code generator.

Laravel- QR code generator example- Usage

Generate

The generate method is used to generate a QR code. It accepts a string as a parameter.
QrCode::generate('My First QR code')

The will return a svg image string. To display a actual QR code to a blade template, you can use-
{!!QrCode::generate('My First QR code')!!}

You can also pass the php variables as an argument to the generate method.
{!!QrCode::generate($string)!!}

You can also save the QR code in your storage by passing a path to the generate method as a second parameter.
QrCode::generate('My First QR code', '../public/qrcode.svg')

It will generate a QR code of the given string and save the svg image in public folder.
Remember, if you are chaining the methods then call the generate method at the end

Format

By default generate method returns a svg image. You can change the format of the returned image of generate method using the format method.

QrCode::format('png');  //This returns a PNG image
QrCode::format('eps');  //This returns a EPS image
QrCode::format('svg');  //This returns a SVG image

The format should be called before any method, if you chaining the methods.

You an embed a png version of QR code in img tag of a laravel blade template like this-
<img src="data:image/png;base64, {!! base64_encode(QrCode::format('png')->generate('My First QR code'))!!} ">

Size

By default generate method returns a smallest pixel of image that is required to create the QR code. You can use size method to change the default size of the image using size method.

QrCode::size(200);

You can chain the above methods to display an bigger size of QR code.

{!!QrCode::size(200)->generate('My First QR code')!!}
//or
<img src="data:image/png;base64, {!! base64_encode(QrCode::format('png')->size(200)->generate('My First QR code'))!!} ">

Color Change

You can also change the color of QR code. It means the black squares can be any color. To change the color of the QR code use the color method and pass the RGB value of the color as a parameter.

QrCode::color(255,12,45)->generate('My First QR code');

Remember, some QR code readers may have difficulties to read the QR code of color that is not black.
You can also change the background color of a QR code using backgroundColor method.

QrCode::backgroundColor(255,255,0)->generate('My First QR code');

Margin

You do also have an option to change the margin around a QR code. Use the margin method to specify a margin.

QrCode::margin(50)->generate('My First QR code');

Encoding

You can change the character encoding that is being used to create the QR code. To know about the character encoding click here. By default generate method is using ISO-8859-1.

Use the encoding method to change the character encoder.

QrCode::encoding('UTF-8')->generate('This is a QR code with special symbols ♠♥!!');

 
Available Character Encoder
ISO-8859-1
ISO-8859-2
ISO-8859-3
ISO-8859-4
ISO-8859-5
ISO-8859-6
ISO-8859-7
ISO-8859-8
ISO-8859-9
ISO-8859-10
ISO-8859-11
ISO-8859-12
ISO-8859-13
ISO-8859-14
ISO-8859-15
ISO-8859-16
SHIFT-JIS
WINDOWS-1250
WINDOWS-1251
WINDOWS-1252
WINDOWS-1256
UTF-16BE
UTF-8
ASCII
GBK
EUC-KR
If you are getting an error that says Could not encode content to ISO-8859-1, then you are using the wrong character encoding type. If you are unsure about which encoder is to use then use UTF-8

Laravel- QR code generator example- Helpers

Helpers are also used to generate QR code, but it also causes the reader to perform some action whenever scanned. The Simple QrCode package supports a lot of helpers. Here I'm going to describe some of them.

E-Mail

The e-mail helper can be used to generate a QR code that fills the email fields like address, subject and body.

//pass php variables
QrCode::email($to, $subject, $body);

//pass the strings
QrCode::email('admin@w3laravel.com', 'Message Subject', 'Message body.');

Geo

It generates a QR code with latitude and longitude and opens Google Maps or any other map app when scanned.

QrCode::geo($lat, $lng);

QrCode::geo(47.8224714, 222.481769);

Phone Number

It accepts a phone number and dials the number whenever scanned.

QrCode::phoneNumber($phone);

QrCode::phoneNumber('91-0000000000');

SMS

It can be used to pre-fill the number of the receiver and the message body.

QrCode::SMS($phoneNumber, $message);

QrCode::SMS('0000000000', 'The body of the message goes here.');

Conclusion

So, in this tutorial you have learned to embed your own custom QR code generator using Simple QR code package in your Laravel web app. The simple QrCode package provide a simple and clean way to generate QR codes.

Do follow us to learn more and share to help others.

Thursday 2 March 2017

Laravel hasMany() and belongsTo() Relationship Tutorial


The database tables are related to each other, so that we can fetch data in a meaningful way. For example an order table should be related to customer table, so that we can know who has placed the order. The relationship can be of many types like one-to-one, one-to-many etc. The laravel hasMany() and belongsTo() relationship is basically one-to-many relationship and its reverse.

In Laravel we can define relationship by just placing a function on the laravel model. So let's discuss more about Laravel hasMany() and belongsTo() Relationship.

Laravel hasMany() and belongsTo() Relationship: Introduction

Take an example of blog post. A blog post can have many comments, so it is a one to many relationship. And its reverse all the comments belongs to a blog post. Laravel eloquent provides some methods that can be used to easily relate database tables. In this tutorial, we are going to learn about two methods that is hasMany() and belongsTo().

Laravel hasMany() and belongsTo() Relationship: Database Tables

Let's have an example of blog post and comments. So, we need to create two tables posts and comments.

Table structure

Table Name Columns
posts id, title, body
comments id, post_id, body
The post_id column will be used as a foreign key to relate comment with the post. You don't need to add foreign key attribute to the column. Laravel will take care of all this.

Create the corresponding model and insert some dummy data too.

To learn about laravel model Click Here.

Laravel hasMany() and belongsTo() Relationship: Defining Relationship

As we have already discussed above, we need to write some method to define relationship between database tables. Here a post can have multiple comments, so we can define a method on Post model-

public function comments(){
 return $this->hasMany('App\Comment');
}

Similarly, in Comment model we can define a method-

public function post(){
 return $this->belongsTo('App\Post');
}

Laravel hasMany() and belongsTo() Relationship: Accessing Collection

Now we can access all the comments of a post whose id is 1-

$comments = Post::find(1)->comments;

Printing collection to Laravel view

You may want to display all of your comments below to a blog post. Here is an example of how you can display your post and all the related comments to a page.

First you need to fetch the post. For this you can use the find() method in your controller.
To learn about Laravel Controllers Click Here.

public function show($id){
 $post = Post::find($id);
 return view('your-view-name', compact('post'));
}

Now, print the post title and body to your view.

<h1>{{$post->title}}</h1>
<p>{{$post->body}}</p>

and to print all the comments of the above post you can use foreach loop like this-

@foreach($post->comments as $comment)
 <li>{{$comment->body}} </li>
@endforeach

You can also find the parent of a comment. Use below code to find out, which post the comment belongs to.

$comment->post->title

Conclusion

This is how we can define relationships between database tables and can also access related data. Laravel also provides some other type of relations that you will learn in different tutorials. If you learned about Laravel hasMany() and belongsTo() Relationship then share to help others too.

Sunday 26 February 2017

PHP PDO insert data into MySQL Database


In this tutorial, you will learn how you can insert data into MySQL database using PHP PDO class. PDO stands for PHP Data Objects. PDO is not limited to only MySQL database, but also can be used with another database systems. PDO is object oriented, it means we need to create an object to access the methods of PDO. So let's start with the tutorial PHP PDO insert data into MySQL Database and learn how you can insert data into MySQL database using PHP's PDO.

PHP PDO insert data into MySQL Database: Creating Database

Here, I'm going to work with a very simple database structure. So, what we going to do first is create a database and a table. Let's take an example of users table which consists of name, email, phone and password column.

Create a users database with these columns-

PHP PDO insert data into MySQL Database

PHP PDO insert data into MySQL Database: Designing a form

After creating a database, we can work a little bit on front end. The design is completely depends upon your web app template. Here I've created a simple form using bootstrap. You can work with this for testing purpose or you can completely design your own design.

Create a file named index.php into root directory of web app and paste the following code.

<!DOCTYPE html>
<html>
<head>
 <title>PHP PDO insert data into MySQL Database</title>
 <link rel="stylesheet" type="text/css" href="css/bootstrap.css">
</head>
<body>
 <div class="container">
  <div class="row">
   <div class="col-md-12">
    <div class="page-header">
     <h1>PHP PDO insert data into MySQL Database</h1>
    </div>
   </div>
  </div>

  <form class="form-horizontal" method="POST" action="insert.php">
   <div class="form-group">
    <label for="name" class="col-sm-2">Name</label>
    <div class="col-sm-10">
     <input type="text" name="name" class="form-control">
    </div>
   </div>

   <div class="form-group">
    <label for="email" class="col-sm-2">Email</label>
    <div class="col-sm-10">
     <input type="text" name="email" class="form-control">
    </div>
   </div>

   <div class="form-group">
    <label for="phone" class="col-sm-2">Phone</label>
    <div class="col-sm-10">
     <input type="text" name="phone" class="form-control">
    </div>
   </div>

   <div class="form-group">
    <label for="password" class="col-sm-2">Password</label>
    <div class="col-sm-10">
     <input type="text" name="password" class="form-control">
    </div>
   </div>

   <div class="col-sm-offset-2">
    <button type="submit" class="btn btn-primary">Save</button>
   </div>
  </form>
 </div>
</body>
</html>

PHP PDO insert data into MySQL Database: Opening a Connection with MySQL

The first file you created is just a collection of html tags. Now you can close that file. Create a new file called insert.php on your root directory and start writing the php codes. The very first thing we need to do is open a connection with MySQL database. Don't worry it's very simple and will take very few steps-

<?php

$servername = "localhost";
$username = "root";
$password = "";
$dbname = "pdo";

try {
    $conn = new PDO("mysql:host=$servername;dbname=$dbname", $username, $password);
    $conn->setAttribute(PDO::ATTR_ERRMODE, PDO::ERRMODE_EXCEPTION); 
}
catch(PDOException $e){
    die('Whoops, some error occured. Please try again later');
}

All the configurations are very simple-

$servername- The host name, if you are working locally, it should be localhost.

$username- The username of your MySQL database. In my case, it is root, you could have your own. If you are working locally, then by default it is root.

$password- Password of your database. If you are working locally, then by default it doen not have any password.

$dbname- The name of the database, you have created in above steps. Write your own database name.

try-catch- We have written the code for opening a connection with MySQL database in try-catch block, because any exception can be occured like- no database found or anything.

die()- The die method is used to stop the execution of PHP program after printing the string within its parameter.

PHP PDO insert data into MySQL Database: Inserting Data into MySQL Database

We already made a connection with MySQL database. Now the only thing we have to do is to insert data into database. Here is how we can insert data into database. I'll explain it in more detail below. keep reading the article PHP PDO data insert into MySQL database.

You don't have a create any other file, just append this code in update.php file.

$data = array('name' => $_POST['name'],
    'email' => $_POST['email'],
    'phone' => $_POST['phone'],
    'password' => $_POST['password']
  );
$sql = "insert into users(name, email, phone, password) values(:name, :email, :phone, :password)";

$statement = $conn->prepare($sql);

$statement->execute($data);


$data- I'm creating an array of data of what we are getting from the html form. The $_POST is a global variable, which is used to accept data from html form when the method is set to post.

$sql- This is the query for inserting data to a database. users is the table name, the columns of the table is (name, email, phone, password) and finally the placeholder for the columns (:name, :email, :phone, :password).

$statement- Whenever we have to execute a query using PHP PDO, first we need to prepare the statement using the prepare() method.
And finally we have to call the function execute() as well as bind the input data. We can bind the input data by passing an array of input data in execute() method as an argument.

Conclusion

That's how we can insert data into MySQL database using PHP PDO class. We can also use mysqli class, but this is limited to MySQL database only. So, PDO is helpful when you need to change the database system.

Share this article PHP PDO insert data into MySQL Database to help other newbies.

Follow us to get more latest updates.